Building a CD process using OpenShift Pipelines
The sample application for deployment is written in Python. The only task that will not be taken from the OpenShift Pipelines' catalog and written manually instead is the task named "nose" for unit-testing the code.
1. Preparation
To install the 'nose' task, just copy the following code block for the task and save it into a file named tasks.yaml
---
apiVersion: tekton.dev/v1beta1
kind: Task
metadata:
  name: nose
spec:
  workspaces:
    - name: source
  params:
    - name: args
      description: Arguments to pass to nose
      type: string
      default: "-v"
  steps:
    - name: nosetests
      image: python:3.9-slim
      workingDir: $(workspaces.source.path)
      script: |
        #!/bin/bash
        set -e
        python -m pip install --upgrade pip wheel
        pip install -r requirements.txt
        nosetests $(params.args)
kubectl apply -f tasks.yaml
oc get tasks
2. Creating PersistentVolumeClaim
The PersistentVolumeClaim (PVC) will be used as a workspace. Use the OpenShift Administrator section to create the PVC.
Skills Network Toolbox -> CLOUD -> Open OpenShift Console
In the main menu:
- switch from Developer to Administrator
- go to Storage -> PersistentVolumeClaims
Now, on the PersistentVolumeClaims page:
- press the Create PersistentVolumeClaim button
-
choose the appropriate StorageClass from the dropdown
(e.g.,skills-network-learner in my case) - in the PersistentVolumeClaim name type cd-openshift-pipeline-pvc
- for Access mode, choose Single user (RWO) radio button
- Size, set to 1 GiB
- for Volume mode, choose the Filesystem radio button
- press the Create button
3. Creating a new Pipeline
In the main menu:
- switch from Administrator back to Developer
- go to Pipelines
Now, on the Pipelines page:
-
press the Create button
(make sure that you have Pipeline selected and not Repository under the button)
Now you're on the Pipeline builder page:
- In the Configure via: field, select Pipeline builder
- In the Name field, enter cd-openshift-pipeline
- Scroll towards the bottom of the page to the Parameters section and press the Add parameter button
-
Add the app-name parameter with its default value by entering the following:
Name: app-name Default value: cicd-app -
Add the build-image parameter:
         Name: build-image
Default value: image-registry.openshift-image-registry.svc:5000/CONTAINER_REGISTRY_NAMESPACE/tekton-lab:latest
Note You'll need to replace CONTAINER_REGISTRY_NAMESPACE with the value appropriate for your setup here
(to get mine, I issued the echo $SN_ICR_NAMESPACE command in the shell) - Scroll further down the page to the Workspaces section and press the Add workspace button
- In the Name field, enter output (this workspace will be used to upload the code to and work on it).
- Press the Create button to save your work
4. Adding tasks to the Pipeline
Now when the groundwork for building the pipeline is done, let's add the tasks to it.
Open the pipeline in edit mode (select Pipeline from the main menu, select the pipeline name, and then go to Actions -> Edit Pipeline)
1 - Adding the cleanup task
- click Add Task in the builder UI to open the Add task... dialog
- type cleanup to see the cleanup task by Red Hat
- press the Add button to start using the task
2 - Adding the git-clone task
- hover over the first task to display the + buttons, then use the + button on the right of the task to add a new task
- click Add task and type git-clone
-
click on the one labeled RedHat and press the Add button
(the red exclamation mark on the task indicates that it needs to be configured) - to configure the task, click on the exclaimation mark
-
then fill in the following fields in the open flyout:
Parameters
	url: https://github.com/ArthurPro123/wtecc-CICD_PracticeCode
Workspaces
	output: output
3 - Adding the Flake8 task (to lint the source code)
- use the + button on the right of the git-clone task to add this one
-
type Flake8 (from the community) and add the task by pressing the Add button
- click on the exclaimation mark
-
fill in the following fields to configure the Flake8 task:
Parameters
	image: python:3.9-slim
	arg: --count
	arg: --max-complexity=10
	arg: --max-line-length=127
Workspaces
	source: output
4 - Adding the nose task (for unit testing the source code)
- use the + button at the bottom of the Flake8 task
-
type nose and add the task by pressing the Add button
- click on the exclaimation mark
-
fill in the following field to configure this custom task:
workspaces
	source: output
5 - Adding the buildah task
- use the + button on the right of the Flake8 task to add this one
-
type RedHat buildah (from RedHat) and add the task by pressing the Add button
- click on the exclaimation mark
-
fill in the following fields to configure the buildah task:
Parameters
	IMAGE: $(params.build-image)
Workspaces
	source: output
6 - Adding a task to deploy the image to the OpenShift cluster
- use the + button on the right of the buildah task to add this one
-
type openshift-client (from RedHat) and add the task by pressing the Add button
- click on the exclaimation mark
-
fill in the following fields to configure the openshift-client task:
Display name: deploy

Parameters
	SCRIPT: oc create deployment $(params.app-name) --image=$(params.build-image) --dry-run=client -o yaml | oc apply -f -
Press the Save button to save the tasks.
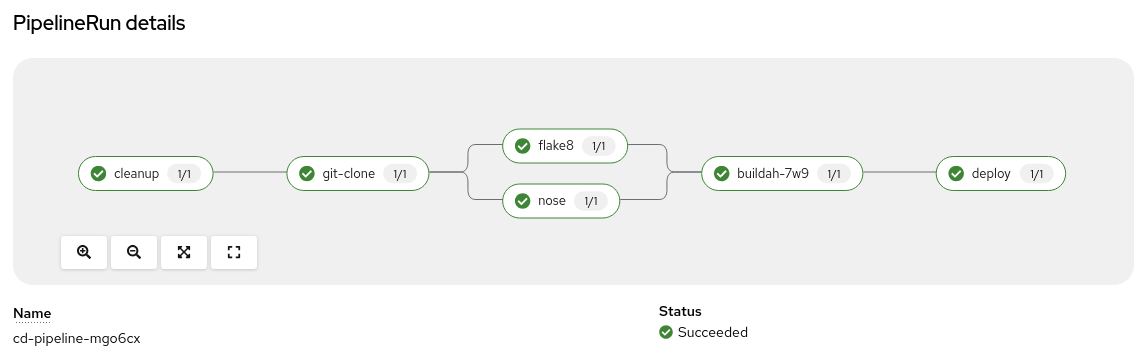
Running the pipeline
To run the pipeline manually, you should be on the pipelines page (if you're not, press the Pipelines button in the main menu. There, select cd-openshift-pipeline pipeline, then click the Actions dropdown, and the
This will display the Start Pipeline modal window.
Make sure that the following options are chosen:
output: PersistentVolumeClaim
PVC: cd-openshift-pipeline-pvc
And finally, press the Start button.
Check the logs to see if there are any issues with the pipeline.
You can click on the task name to view the logs for a particular task. Alternatively, you can click on the Logs tab.
Confirming the deployment of the application
Click on Topology in the main menu (available in the Developer section). There, you should see the applications that are currently running.
Click on the one called cicd-app and then click on View logs in the flyout.If everything worked well, there should be a message SERVICERUNNING displayed. This message was generated by the Python code deployed (for demonstration purposes) and has nothing to do with OpenShift.